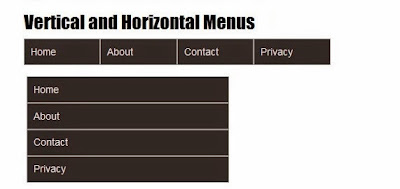
The previous lesson of html lessons series was about types of css. In this lesson we will learn to make navigation menus
using unordered lists.

Unordered Lists in Html
An unordered list in html starts with a <ul> and ends with a matching closing </ul> tag. Inside the unordered list are list items. Each list item starts with the <li> tag and ends with a matching closing </li> tag. Check the below mentioned code to create a simple unordered list:
<ul>
<li>Home</li>
<li>About</li>
<li>Contact</li>
<li>Privacy</li>
</ul>
The output of the above code will look something like this in a web page:

Now this may look like anything but not a navigation menu for sure. So we will have to apply some css to it to make it look like a navigation menu. There are two types of navigation menus:
1) Vertical navigation menu
2) Horizontal navigation menu
We will make both vertical and horizontal navigation menus. Let us make a vertical navigation menu first.
Vertical Navigation Menu
The html code for the menu will remain the same as the code that we used for the unordered list. We will only apply some css to the unordered list to make a vertical navigation menu. The first thing we need to do is to get rid of those dots in the list items by applying list-style none property to the list items (li) and after the dots are gone we will apply some more css to the unordered list to make it look better i.e
<head>
<style>
li{ list-style:none;border:2px solid #A09D9D;background:#262323;color:#F1E2E2;padding:10px;width:300px;font-family:Arial; }
</style>
</head>
<body>
<ul>
<li>Home</li>
<li>About</li>
<li>Contact</li>
<li>Privacy</li>
</ul>
</body>
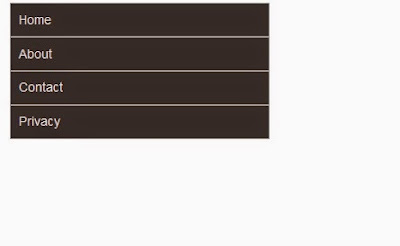
The above code will output a vertical navigation menu looking like this one:

Horizontal Navigation Menu
Just like the vertical navigation menu the html code for the horizontal navigation menu will also remain the same. We will only play with the css a bit to make a horizontal navigation menu. To make a horizontal navigation menu we will have to apply float property to the list items (li) to make them appear in one line and overflow hidden property to the unordered list (ul) to tell it that the list items inside it are floated and them as such. To learn more about css float property you can read this article. Apart from that we will decrease the width of the list items a bit to make them fit in one line.
<head>
<style>
ul{overflow:hidden;}
li{ list-style:none;float:left;border:2px solid #A09D9D;background:#262323;color:#F1E2E2;padding:10px;width:100px;font-family:Arial; }
</style>
</head>
<body>
<ul>
<li>Home</li>
<li>About</li>
<li>Contact</li>
<li>Privacy</li>
</ul>
</body>
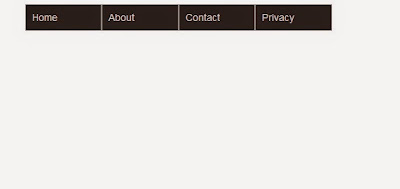
The above code will output a horizontal navigation menu looking like this one:

Related Posts
Unordered Lists in Html
An unordered list in html starts with a <ul> and ends with a matching closing </ul> tag. Inside the unordered list are list items. Each list item starts with the <li> tag and ends with a matching closing </li> tag. Check the below mentioned code to create a simple unordered list:
<ul>
<li>Home</li>
<li>About</li>
<li>Contact</li>
<li>Privacy</li>
</ul>
The output of the above code will look something like this in a web page:

Now this may look like anything but not a navigation menu for sure. So we will have to apply some css to it to make it look like a navigation menu. There are two types of navigation menus:
1) Vertical navigation menu
2) Horizontal navigation menu
We will make both vertical and horizontal navigation menus. Let us make a vertical navigation menu first.
Vertical Navigation Menu
The html code for the menu will remain the same as the code that we used for the unordered list. We will only apply some css to the unordered list to make a vertical navigation menu. The first thing we need to do is to get rid of those dots in the list items by applying list-style none property to the list items (li) and after the dots are gone we will apply some more css to the unordered list to make it look better i.e
<head>
<style>
li{ list-style:none;border:2px solid #A09D9D;background:#262323;color:#F1E2E2;padding:10px;width:300px;font-family:Arial; }
</style>
</head>
<body>
<ul>
<li>Home</li>
<li>About</li>
<li>Contact</li>
<li>Privacy</li>
</ul>
</body>
The above code will output a vertical navigation menu looking like this one:

Horizontal Navigation Menu
Just like the vertical navigation menu the html code for the horizontal navigation menu will also remain the same. We will only play with the css a bit to make a horizontal navigation menu. To make a horizontal navigation menu we will have to apply float property to the list items (li) to make them appear in one line and overflow hidden property to the unordered list (ul) to tell it that the list items inside it are floated and them as such. To learn more about css float property you can read this article. Apart from that we will decrease the width of the list items a bit to make them fit in one line.
<head>
<style>
ul{overflow:hidden;}
li{ list-style:none;float:left;border:2px solid #A09D9D;background:#262323;color:#F1E2E2;padding:10px;width:100px;font-family:Arial; }
</style>
</head>
<body>
<ul>
<li>Home</li>
<li>About</li>
<li>Contact</li>
<li>Privacy</li>
</ul>
</body>
The above code will output a horizontal navigation menu looking like this one:

Important Css Properties
Css Float Property
Css Margin and Padding Properties
Types of Css
No comments:
Post a Comment